


SEMI AUTOMATIC MEAT SLICER OPERATION MANUAL
Min.Order : 1 Pieces Quick Quotation >
Conpany Profile
Product Details
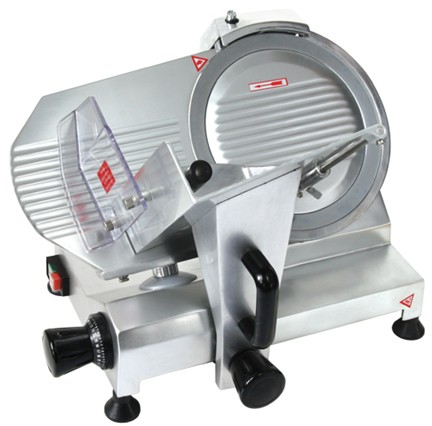
Thank you for purchasing our semiautomatic meat slicer.
The meat slicer,produced by our company sharing advantages of the similar meat slicer at home and aboard, is easier and more safe to operate.
The meat slicer is specifically designed for food use, it can cut ham, frozen meat without bone, fresh meat (beef, lamb), vegetables (such as ginger, potatoes, carrots, sweet potatoes, etc.), suitable to use in restaurants, hotels, supermarkets and food processing plants.
The machine should work in a environment with relative humidity not more than 85%.
CONTENTS
1?Notices
2?Main technical specifications
3?Operation instructions
3.1 Ready place for meat slicer
3.2 Unpacking
3.3 Parts and locations
3.4 lubrication
3.5 Power wire connection
3.6 Test-run without loading
3.7 Blade grinding
3.8 Slicing thickness adjustment
3.9 Melting meat
3.10 Changing blade
4?Circuit diagram
5?Trouble shooting
1. Notices
•The power must comply with electric requirements on the label rating. If improperly use, fire or series trouble may be occured.
•The machine must be earthed when using, it is dangerous to get an electric shock if not earthed or not reliable to be earthed.
•Please turn off all switches and cut off power when emergency happens.
•The hands or other parts of body are not allowed to enter workspace when the machine is running, otherwise people may get hurt..
•The machine should be repaired by manufacturer or agents if it is broken.
•We are not responsible for injurys or equipment faults if machine is modified by users themselves.
•When the electric wire is damaged, it must be changed immediately.
•The electric wire must be special soft wire bought from manufacturer or repairing department.
•The machine can not be flushed by water, for it is not waterproof structure, otherwise it will cause an electric shock and damage the electric parts.
•Please turn off all switches when machine is not operated and cut off the power.
•Please stop operating and turn off the machine when cleaning the machine.
•Must stop the machine when it is found operating abnormally.
•Loose clothes cannot be wired when operating the machine, and long hair should be covered by a cap.
•Often check blade-cover, carriage, blade and other parts in case of getting loose or damaged
• Frozen meat with temperature below -6? cannot be cut.
• Please attach this operation manual when resell the machine.
• Please contact us when the manual operation is damage or lose.
• Please contact us when you meet other problems which have no detail in the manual operation.
•The machine is not allowed to be operated by the disable, children or people without experience, unless they are under supervision or instruction of professional personal who can make sure the safety.
The safety labels on the machine
 Reliable earth wire must be connected to avoid personal injury due to leakage.
 Keep hands off the workplace when machine running, in case of injury.
 Be careful when clean and change blade, and keep hands off the blade edge in case of injury.
2. Main Technical Specifications
|
Specification Model |
Voltage |
Frequency |
Power (W) |
Rotating speed |
Slicing thickness (mm) |
Blade dia (mm) |
Weight (kgs) |
Diamention |
Width |
|
GK- 300 |
220 |
50 |
250 |
1400 |
0~15 |
F300 |
25 |
510*440*432 |
220 |
|
GK-250 |
220 |
50 |
150 |
1400 |
0~12 |
F250 |
20 |
480*370*370 |
220 |
|
GK-220 |
220 |
50 |
150 |
1400 |
0~12 |
F220 |
18 |
480*370*370 |
220 |
|
Die-casting GK-300 |
220 |
50 |
250 |
1400 |
0~15 |
F300 |
25 |
510*440*432 |
220 |
|
Die-casting GK-250 |
220 |
50 |
150 |
1400 |
0~12 |
F250 |
20 |
480*370*370 |
220 |
|
Die-casting GK- 220 |
220 |
50 |
150 |
1400 |
0~12 |
F220 |
18 |
480*370*370 |
220 |
3. Operation Instructions
3.1 Ready suitable place for meat slicer
The slicer should be placed on sturdy, flat platform or desktop and set aside adequate space for the slicer in order to operate, maintain, and ventilate.
Power requirements of the slicer
Power condition: AC, 1 phase, 50Hz. The slicer is attached with it a standard triangle plug with earth wire, the power socket must be the standard triangle.
3.2 Unpacking
Before installation, please check all items attached with the machine. If anything missed, please contact the supplier.
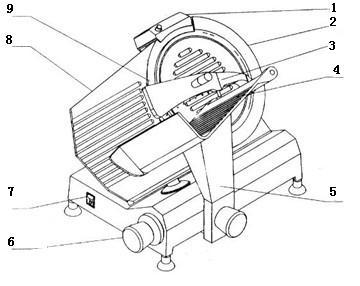
3.3 Machine parts and their locations
Attention:In order to ensure the machine can be used successfully, please carefully read this chapter and get familiar with the parts and their locations.
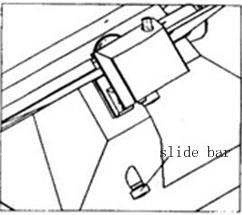
3.4 Lubrication
3.4.1Turn over the machine, spread the lubricating oil on the surface of square orbit and circle orbit every 7 day.
3.4.2 Spread food oil on the slide bracket .
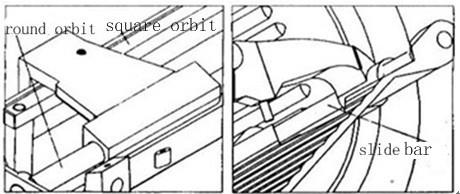

Attention: Turn off the switch and cut off the power of the machine when spread the oil.
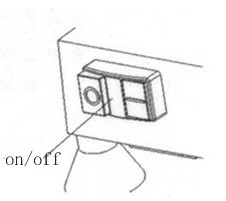
3.5 Power wire connection
3.5.1 The switch locates on the left side of the machine. Turn the switch to “0”, the slicer is turned off.
3.5.2 Insert the plug into the power socket, the rated current should not less than 10A.
3.5.3 When use a 2 phase plug, it should be reliably earthed.
3.6 Test-run the machine without loading
3.6.1 Before test-run the machine, you should carefully check the tightness and damage of blade cover, carrier , blade and other parts and spread the oil on the surface of square orbit and circle orbit.
3.6.2 Press the button to exam if the blade works or not, to exam if there is something unusual happens.
3.6.3 If there is nothing unusual happens, you can use the machine after three minutes unloading work.
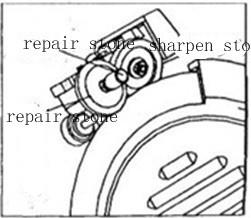
3.7 Blade grinding
3.7.1The round blade of the meat slicer is made by high-quality wear-resistant tool steel , the edge of the blade has been sharpened by the manufacturer before-sale.
3.7.2 The round blade may turn dull after use and you can choose the grinding stone carried with the equipment to regrind, repeatedly and timely. Before sharpening the blade, you should clean the oil spill to avoid it stains on the wheel, If the wheel is stained by the oil, you can use brush and alkaline water to clean the grinding stone.
3.7.3 When the sharpen is not working, grinding stone should be kept away from blade, when it works, it should get close to the blade.
The method to change the position:
Hold the wheel cover to the proper height, rotate 180 ° and then press the locking knob .
Attention: The height of the sharpener is limited by a stud, and elongation of the stud can be adjusted.

3.7.4 The sharpener is equipped with two grinding wheels, one is for sharpening wheel, the other one is for the repair of the edge.
Press the button when sharpening the blade,rotate the blade and press the end of grinding shaft by hands, making grinding stone touch the blade, and rotating blades driven wheel, then the blade can be sharpened.
when sharpen the blade,you should press the end of grinding shaft by hands in the aim of repair edge burr, please do not grinding excessively.
Attention:
·Slightly press the grinding shaft, better to produce little spark.
·Adjust the position of the grinding stone to make the grinding stone locates on the front side of blade but can not touch the edge of the blade.
3.7.5 Sharpening effect
Loosen the stone axis and press button to make the stone out of the blade, press the button , to stop the blade, and observe the sharpening effect
If the blade edge appears sharp burr, it proves that the blade is sharp enough and sharpening is finished. Otherwise you can repeat the process until you feel satisfied.
Attention: Please don’t use finger to test whether the blade is sharp or not, in case of the finger gets hurt.
3.7.6 Clean the steel and grinding stone ash on the machine.
When clean the blade, you can remove the protection cover.
Attention: Please don’t use water to flush, either can not use cleanser that harmful to human health.
3.7.7After repeated regrinding, the diameter of the blade will become smaller. When the distance between locking board and the edge of the blade is more than 5mm, please loosen the screw on the back of the locking board, move the locking board towards the blade and keep their distance at 2mm, then tight the screw.
Attention: The blade needs to be changed when its diameter reduced by 12mm.
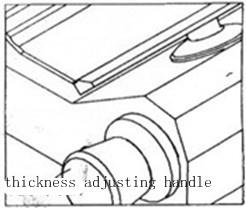
3.8 Slicing thickness adjustment
3.8.1 The slicing thickness is the distance between the blade and locking board.
3.8.2 Counterclockwise the handle bar, the slice becomes thick, clockwise the handle bar, slice thin.
3.8.3 When adjusting the thickness of the slice to thick, please remember to eliminate the transmission gap. The solution is first enlarge the slicing thickness then decrease to the desired thickness. When adjusting the thickness of the slice to thin, don’t need to eliminate the transmission gap, directly adjust to the desired thickness.

3.9 Melting meat
3.9.1 If the frozen meat is too hard, it is easy to appear fragments when cut thin slices; when cut thick slice the resistance may too large and likely to cause motor stall, or even burn the motor, so the meat must be melt (put frozen meat in the incubator, the process that the temperature of the meat both inside and outside rise slowly called melting the meat.
3.9.2 Meat thickness less than 1.5mm, suitable meat temperature both inside and outside is -4? (put the frozen meat in the refrigerator that has been cut off power for eight hours ). . Press the meat with a fingernail ,the surface of the meat may appear impression
3.9.3 Slice thickness more than 1.5mm, the meat temperature should be higher than -4 ° C . And as the thickness increases, the temperature of meat should also be increased correspondingly.
3.10 Change the blade
3.10.1 Remove the blade cover.
Remove the carrier away from the blade.
Unscrew the rod from the back of the machine.
Move away the blade cover.
3.10.2 Remove the sharpener.
3.10.3 Take off the blade
Unscrew the three screws, remove the blade evenly.
3.10.4 When install the blade; wipe out the locating surface and the blade,
gradually tighten the three screws for fixing
Attention: When replace the blade, the machine must be turned of and power must be cut off.
When replace the blade, please wear protective gloves, and take care of the sharp edge when remove or install the blade.

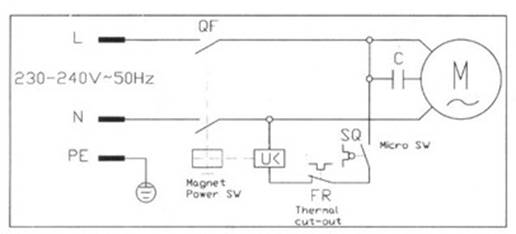
4. Circuit Diagram
5. Trouble Shooting
The machine must be repaired, maintained by professionals and non - professionals are not allowed to repair, so as not to cause personal injury or mechanical, electrical fault.
Common troubles and solutions are shown in Table 1
When troubles are not listed in the table or solutions do not work, please contact the agent or the manufacturer
Table 1
|
Troubles |
Solutions |
|
1.The machine does not work |
Check whether the machine connect reliable power |
|
2. The machine can not cut meat or the meat slices is irregular |
1.The blade is not sharp , please read the chapter3.7 and |
|
3.The blade edge is not sharp |
1.Check the wheel installation height and grinding angle, please read chapter 3.7 and use the correct method to grind the blade |
|
4.Tha machine works slowly or the blade rotates slowly |
Take off the bottom board, and adjust the tensioning belt as shown in picture below(belt in new machine should be adjusted every 2-3 months, belt in old machine should be adjusted when necessory. The warranty period of the new belt is 9 months). |
Take off the bottom board

Firstly loosen the nut below, then adjust the belt tension by regulating the nut.

Recommend Product
Privacy Policy -Terms of Use
Greater stability and upgraded communication tools


 Home
Home
 Inquiries
 RFQ
RFQ
 Your Request
 My Favorites
 Order
Order